What is Packer?
Now that we have a hand crafted VirtualBox VM, let's do the simplest thing we can and transform it into a Vagrant box. The tool we'll be using to accomplish this is Packer.
Packer is an open source tool for creating identical machine images for multiple platforms from a single source configuration. Packer is lightweight, runs on every major operating system, and is highly performant, creating machine images for multiple platforms in parallel. Packer does not replace configuration management like Chef or Puppet. In fact, when building images, Packer is able to use tools like Chef or Puppet to install software onto the image.
Before we begin, I recommend creating a Git repository to hold the project files. We'll be iterating over the project and you don't want to lose your hard work to a "fat finger" mistake. For reference, you can find mine here.
Creating the Appliance
The way Packer works is that it starts up a virtual machine and uses SSH to issue commands and copy files. So, in order for Packer to work, we need to verify that an SSH server is running. Start up the VM from the previous day, log in and install OpenSSH. sudo apt-get update && sudo apt-get install ssh
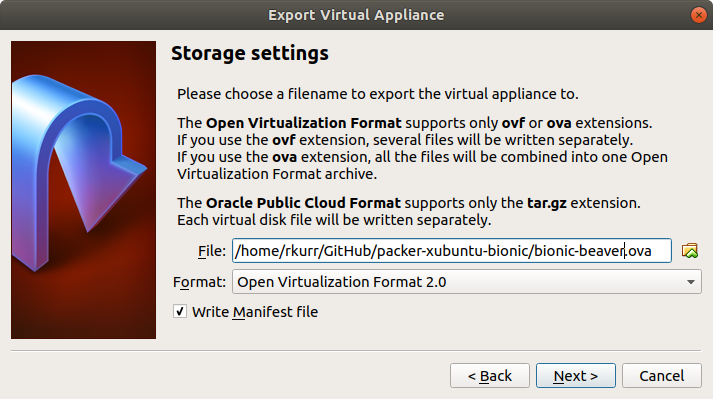
Now that we have SSH installed, it is time to shutdown the machine: sudo shutdown --poweroff now. Once the machine is off, we need to export it as appliance. The goal is to export the VM so that Packer can use it as the basis for the new machine we'll be customizing.
Packer Descriptor
Packer is driven by a JSON file, giving the tool the hints it needs to do its job. The basic format of the file looks like this:
{
    "description": "Builds a Xubuntu 18.04 desktop box with various software development tools installed",
    "min_packer_version": "1.2.2",
    "variables": {},
    "builders": [],
    "provisioners": [],
    "post-processors": []
}
- description - shown in Vagrant Cloud, describing the box
- min_packer_version - minimum Packer version that can run the script
- variables - where often changing values are stored
- builders - desciption of the assembly modules being used, e.g. virtualbox-ovf
- provisioners - tools that are used to configure the box during processing, e.g. ansible-local
- post-processors - describes what to do with the box once it is created, e.g. vagrant-cloud
Variables Section
The variables section is where I like to keep information that is either changes between builds or is repeated within the file. Variables can be overriden on the command-line, making them a nice tool for setting values dynamically.
"variables": {
    "ssh_name"            : "vagrant",
    "ssh_pass"            : "vagrant",
    "virtualbox_appliance": "bionic-beaver.ova"
},
You will notice that the SSH credentials matches the account we created in the source VM. If the credentials are incorrect, Packer won't be able to run any commands against your VM and will fail. The virtualbox_appliance variable is the path to the appliance we just made. It can live anywhere on the file system but I like to keep mine in the local directory.
Builders Section
The builders section is a list of modules that can be used to generate machines targetted to different platforms, such as VirtualBox, HyperV and VMWare. Notice that the section is a list, which means that we can generate multiple artifacts at the same time. For now, we'll just use a single builder: virtualbox-ovf.
"builders": [{
                 "type"        : "virtualbox-ovf",
                 "source_path" : "{{user `virtualbox_appliance`}}",
                 "ssh_username": "{{user `ssh_name`}}",
                 "ssh_password": "{{user `ssh_pass`}}",

                 "boot_wait": "30s",
                 "format": "ova",
                 "guest_additions_mode": "disable",
                 "headless": false,
                 "keep_registered": false,
                 "shutdown_command": "sudo shutdown --poweroff now",
                 "shutdown_timeout": "2m",
                 "skip_export": false,
                 "output_directory": "output-virtualbox-ovf",
                 "vboxmanage": [
           		     ["modifyvm", "{{.Name}}", "--vram", "32"],
           		     ["modifyvm", "{{.Name}}", "--memory", "2048"],
           		     ["modifyvm", "{{.Name}}", "--cpus", "1"]
           	     ],
                 "vm_name": "packer-bionic-xubuntu"
            }],
Of the numerous attributes described in the builder, there are a few that are of particular interest. The type attribute tells Packer that we want to use an VirtualBox applicance as the source of our VM and the format attribute says the appiance is in encoded using the OVA format. The syntax used by source_path, ssh_username and ssh_password dereference the values in the variables section.
Provisioners Section
This is a very important section but, for now, we'll leave it blank.
Post-processors Section
This block tells Packer what to do after the artifact is created. Being a list, we can give Packer several directives. For now, we'll keep it simple. What we want to do is to export the virtual machine into a form that Vagrant understands.
"post-processors": [
                       [{
                            "compression_level": 9,
                            "keep_input_artifact": false,
                            "output": "vagrant/bionic-xubuntu.box",
                            "type": "vagrant"
                       }]
                    ]
- compression_level - an integer between 0 and 9 indicating how much effort to expend when compressing the artifact.
- keep_input_artifact - a true value indicates that we do not delete the output_directory on a successful build, which can be useful for debugging or experimentation.
- output - path to the box file that will be created.
- type -indicates that we are targetting Vagrant
Building The Box
Now that we have a valid Packer file, all we need to do is run Packer. I like to do this in two steps. The first step validates the configuration file, looking for the inveitable mistakes, while the second step actually builds the box.
packer validate packer.jsonpacker build --force packer.json
Template validated successfully.

virtualbox-ovf output will be in this color.

==> virtualbox-ovf: Downloading or copying OVF/OVA
    virtualbox-ovf: Downloading or copying: file:///home/rkurr/GitHub/packer-xubuntu-bionic/bionic-beaver.ova
==> virtualbox-ovf: Importing VM: /home/rkurr/GitHub/packer-xubuntu-bionic/bionic-beaver.ova
==> virtualbox-ovf: Creating forwarded port mapping for communicator (SSH, WinRM, etc) (host port 2367)
==> virtualbox-ovf: Executing custom VBoxManage commands...
    virtualbox-ovf: Executing: modifyvm packer-bionic-xubuntu --vram 32
    virtualbox-ovf: Executing: modifyvm packer-bionic-xubuntu --memory 2048
    virtualbox-ovf: Executing: modifyvm packer-bionic-xubuntu --cpus 1
==> virtualbox-ovf: Starting the virtual machine...
==> virtualbox-ovf: Waiting 30s for boot...
==> virtualbox-ovf: Typing the boot command...
==> virtualbox-ovf: Waiting for SSH to become available...
==> virtualbox-ovf: Connected to SSH!
==> virtualbox-ovf: Uploading VirtualBox version info (5.2.10)
==> virtualbox-ovf: Gracefully halting virtual machine...
==> virtualbox-ovf: Preparing to export machine...
    virtualbox-ovf: Deleting forwarded port mapping for the communicator (SSH, WinRM, etc) (host port 2367)
==> virtualbox-ovf: Exporting virtual machine...
    virtualbox-ovf: Executing: export packer-bionic-xubuntu --output output-virtualbox-ovf/packer-bionic-xubuntu.ova
==> virtualbox-ovf: Deregistering and deleting imported VM...
==> virtualbox-ovf: Running post-processor: vagrant
==> virtualbox-ovf (vagrant): Creating Vagrant box for 'virtualbox' provider
    virtualbox-ovf (vagrant): Unpacking OVA: output-virtualbox-ovf/packer-bionic-xubuntu.ova
    virtualbox-ovf (vagrant): Renaming the OVF to box.ovf...
    virtualbox-ovf (vagrant): Compressing: Vagrantfile
    virtualbox-ovf (vagrant): Compressing: box.ovf
    virtualbox-ovf (vagrant): Compressing: metadata.json
    virtualbox-ovf (vagrant): Compressing: packer-bionic-xubuntu-disk001.vmdk
Build 'virtualbox-ovf' finished.

==> Builds finished. The artifacts of successful builds are:
--> virtualbox-ovf: 'virtualbox' provider box: vagrant/bionic-xubuntu.box
Importing The Box
Once we have the box created, we need to import it into Vagrant before we can test it. These commands will get your newly minted box into Vagrant's cache:
vagrant box add --clean --force --name bionic-xubuntu vagrant/bionic-xubuntu.boxvagrant box list
==> vagrant: A new version of Vagrant is available: 2.0.4!
==> vagrant: To upgrade visit: https://www.vagrantup.com/downloads.html

==> box: Box file was not detected as metadata. Adding it directly...
==> box: Adding box 'bionic-xubuntu' (v0) for provider:
    box: Unpacking necessary files from: file:///home/rkurr/GitHub/packer-xubuntu-bionic/vagrant/bionic-xubuntu.box
==> box: Successfully added box 'bionic-xubuntu' (v0) for 'virtualbox'!

bionic-xubuntu        (virtualbox, 0)
Testing The Box
Now the Vagrant is aware of our box, it is time to take it for a test drive. We do this by having Vagrant create a basic Vagrantfile for us, and then running it.
vagrant init bionic-xubuntuvagrant upvagrant ssh
Before we can fire up the box, we need to modify the generated Vagrantfile because it doesn't contain our SSH credentials. Edit the file so it looks similar to this:
Vagrant.configure("2") do |config|
    # provide our custom SSH credentials
    config.ssh.username = "vagrant"
    config.ssh.password = "vagrant"
Once the change is made, you can fire up the box and, hopefully, ssh into it.
vagrant init bionic-xubuntu
A `Vagrantfile` has been placed in this directory. You are now
ready to `vagrant up` your first virtual environment! Please read
the comments in the Vagrantfile as well as documentation on
`vagrantup.com` for more information on using Vagrant.

vi Vagrantfile

vagrant up
Bringing machine 'default' up with 'virtualbox' provider...
==> default: Importing base box 'bionic-xubuntu'...
==> default: Matching MAC address for NAT networking...
==> default: Setting the name of the VM: bionic_default_1524320521765_58756
==> default: Clearing any previously set network interfaces...
==> default: Preparing network interfaces based on configuration...
    default: Adapter 1: nat
==> default: Forwarding ports...
    default: 22 (guest) => 2222 (host) (adapter 1)
==> default: Running 'pre-boot' VM customizations...
==> default: Booting VM...
==> default: Waiting for machine to boot. This may take a few minutes...
    default: SSH address: 127.0.0.1:2222
    default: SSH username: vagrant
    default: SSH auth method: password
    default: Warning: Connection reset. Retrying...
    default: Warning: Remote connection disconnect. Retrying...
    default: Warning: Connection reset. Retrying...
    default: Warning: Remote connection disconnect. Retrying...
    default: Warning: Connection reset. Retrying...
    default: Warning: Remote connection disconnect. Retrying...
    default: Warning: Connection reset. Retrying...
    default: Warning: Remote connection disconnect. Retrying...
    default: Warning: Connection reset. Retrying...
    default:
    default: Inserting generated public key within guest...
    default: Removing insecure key from the guest if it's present...
    default: Key inserted! Disconnecting and reconnecting using new SSH key...
==> default: Machine booted and ready!
==> default: Checking for guest additions in VM...
    default: The guest additions on this VM do not match the installed version of
    default: VirtualBox! In most cases this is fine, but in rare cases it can
    default: prevent things such as shared folders from working properly. If you see
    default: shared folder errors, please make sure the guest additions within the
    default: virtual machine match the version of VirtualBox you have installed on
    default: your host and reload your VM.
    default:
    default: Guest Additions Version: 5.1.28_Ubuntu r117968
    default: VirtualBox Version: 5.2
==> default: Mounting shared folders...
    default: /vagrant => /tmp/bionic
Vagrant was unable to mount VirtualBox shared folders. This is usually
because the filesystem "vboxsf" is not available. This filesystem is
made available via the VirtualBox Guest Additions and kernel module.
Please verify that these guest additions are properly installed in the
guest. This is not a bug in Vagrant and is usually caused by a faulty
Vagrant box. For context, the command attempted was:

mount -t vboxsf -o uid=1000,gid=1000 vagrant /vagrant

The error output from the command was:

vagrant ssh
Welcome to Ubuntu 17.10 (GNU/Linux 4.13.0-38-generic x86_64)

 * Documentation:  https://help.ubuntu.com
 * Management:     https://landscape.canonical.com
 * Support:        https://ubuntu.com/advantage

 * Meltdown, Spectre and Ubuntu: What are the attack vectors,
   how the fixes work, and everything else you need to know
   - https://ubu.one/u2Know

0 packages can be updated.
0 updates are security updates.


Last login: Sun Apr 15 10:59:17 2018
Don't worry about the warning. We didn't install the VirtualBox Guest Additions so certain features are unavailable. We'll fix that in the future.
Summary
Today, we created a bare bones Vagrant box that runs on VirtualBox, using a very simple recipe. We'll expand that recipe to enable more complex configurations and learn how to share our box with collegues.
Full packer.json
               {
                   "description": "Builds a Xubuntu 18.04 desktop box with various software development tools installed",
                   "min_packer_version": "1.2.2",

                   "variables": {
                       "ssh_name"            : "vagrant",
                       "ssh_pass"            : "vagrant",
                       "virtualbox_appliance": "bionic-beaver.ova"
                   },

                   "builders": [{
                       "type"        : "virtualbox-ovf",
                       "source_path" : "{{user `virtualbox_appliance`}}",
                       "ssh_username": "{{user `ssh_name`}}",
                       "ssh_password": "{{user `ssh_pass`}}",

                       "boot_wait": "30s",
                       "format": "ova",
                       "guest_additions_mode": "disable",
                       "headless": false,
                       "keep_registered": false,
                       "shutdown_command": "sudo shutdown --poweroff now",
                       "shutdown_timeout": "2m",
                       "skip_export": false,
                       "output_directory": "output-virtualbox-ovf",
                       "vboxmanage": [
               		        ["modifyvm", "{{.Name}}", "--vram", "32"],
               		        ["modifyvm", "{{.Name}}", "--memory", "2048"],
               		        ["modifyvm", "{{.Name}}", "--cpus", "1"]
               	      ],
                         "vm_name": "packer-bionic-xubuntu"
                   }],
                   "provisioners": [],
                   "post-processors": [
                       [{
                            "compression_level": 9,
                            "keep_input_artifact": false,
                            "output": "vagrant/bionic-xubuntu.box",
                            "type": "vagrant"
                       }]
                   ]
               }